Website Backup is one of the most important things for website owners. Sometimes, your website may break due to updates or core code edits. Also, your website may hack. In no doubt, your website is very important for you. So, you should take the backup regularly of your entire website including the database but you don’t have time to take the backup regularly. Maybe you are searching for a plugin to take a daily basis backup of your website automatically. In this article we are going to discuss about the best auto backup & auto migration plugin in WordPress.
Best Auto Backup & Auto Migration Plugin in WordPress:
How you will feel if your daily auto backup automatically uploads on your remote storage like Google Drive, OneDrive, or Dropbox. In this article, we’re going to discuss about how to take daily auto backup to the remote storage of your entire WordPress website.
After researching a few most popular auto backup & migration plugins, we found a better plugin called “wpvivid”. We’re going to learn how to use this plugin to get 100% results with the free version. So, keep reading ….
Installation of WPvivid Plugin (Free Version):
To install the WPvivid plugin simply you need to login on to your WordPress dashboard. After logging, hover over on the “Plugins” option and click the “Add New” button as well as search with this keyword “WPvivid”.

Best Auto Backup & Auto Migration Plugin

Now you should find the WPvivid plugin at the first line. Make sure the author is WPvivid Team. It’s time to install the plugin. Install and make it active.
After activating the plugin, you need to go to WordPress dashboard there you should see a few new options like the screenshot attached below.

Best Auto Backup & Auto Migration Plugin

Few Essential Settings of WPvivid auto backup plugin:
- To prevent backup failing due to timeout, make sure to uncheck “Calculate the size of files, folder and database before backing up”.

Best Auto Backup & Auto Migration Plugin

2. Setup Remote Storage: It’s important to take daily backup of your WordPress site. To take daily backup to your remote storage, you need to configure remote storage. You can use Google Drive, Dropbox or OneDrive as your remote storage. To set Google Drive as your remote storage, Please click on the “Remote Storage” tab from WPVivid option pane and then give a name to identify the remote storage. After that click the authenticate button to connect your Google Drive, Dropbox or OneDrive as your remote storage.
Best Auto Backup & Auto Migration Plugin

3. Configure schedule backups: It’s really crucial to configure schedule backup of your WordPress website. After setting up of the remote storage, you can configure schedule backup of your site. To do it simply click on the “Schedule” tab from WPVivid option panel. Make sure to give a tick mark on “enable backup schedule”, and then select the time when you want to take the backup. It might be daily or weekly. At the next step please make sure to select “Database + Files (WordPress Files)” to take the entire backup of you full website. At the last stage select “Send backups to remote storage”, It will automatically take and upload a full backup of your website. Finally, click the “Save Changes” button.

Best Auto Backup & Auto Migration Plugin
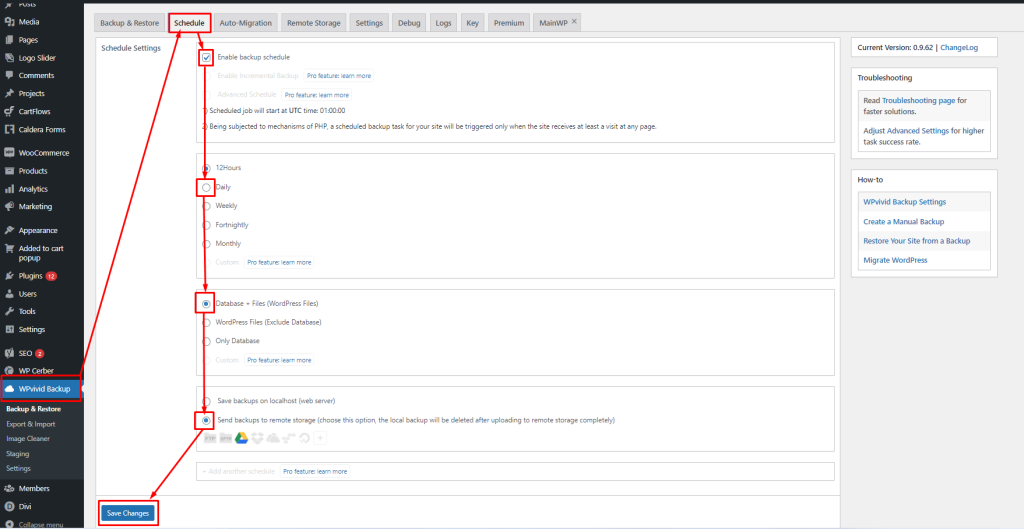
Table of Contents :
- Change RETURN TO SHOP Link in WooCommerce
- Remove Related Products on WooCommerce
- Change Add to Cart Text in WooCommerce
- Disable Gutenberg Widget Block Editor
- Best Auto Backup & Auto Migration Plugin in WordPress
- How to change WordPress admin password from database
- Fix Error Establishing a Database Connection in WordPress